How to Convert Outlook PST files?
Step By Step Guide to Repair PST file and Export/Convert Outlook PST files to New PST with entire Outlook database items emails, contacts, calendars, etc.
Introduction
"PassFixer PST Converter/Recovery Software", Most efficient technique to resolve all PST file corruption errors and convert PST into numerous file format with simple steps. Straight-forwardly repair PST file and easily extract entire emails, contacts, calendars, etc from corrupt PST to multiple available conversion options and cloud options.
- Perform both single as well as Bulk PST file conversion.
- Before conversion, get live preview of each folders & individual items of PST file.
- Create separate PST file for each PST mailbox while making bulk PST file conversion.
- Export data from multiple PST file to a single PST file.
- Save emails individually from PST to EML, EMLX, HTML, and MSG file format
- Export Contacts and calendar items from older PST to New PST as wwll as, MSG, ICS, vCard files.
- Make Outlook PST file Conversion with complete security
- Powerfully repair and convert both corrupt/inaccessible or encrypted PST files.
How to Convert Outlook PST files using PST Converter?
Follow the below mentioned steps to Export/Convert PST files:-
Step 1:- Download PassFixer for PST Converter Software on a windows based machine, & launch it.
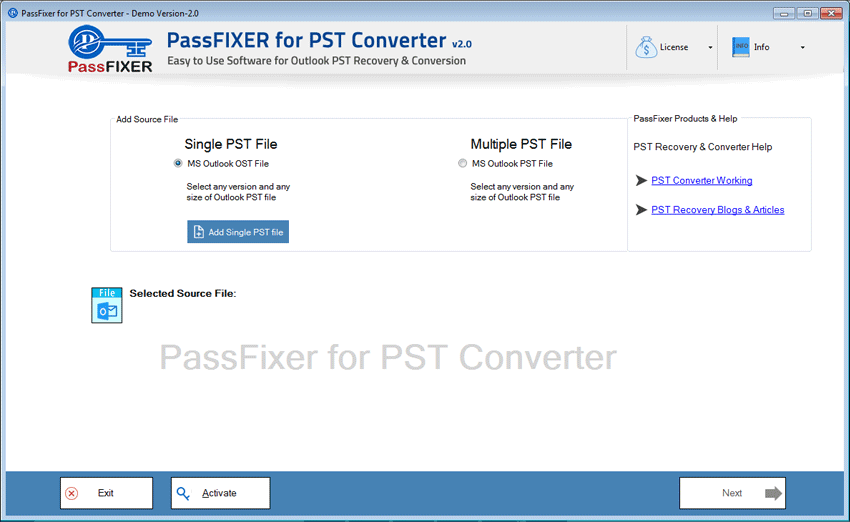
Step 2:- Next, the software will display two different option for Outlook PST file selection.
- Single PST File:- Select this option to add single PST file for conversion at a time from the known location.
- Multiple PST file:- Add multiple Outlook PST files from local drive to perform PST file conversion in bulk.
Click on MS Outlook PST file radio button, and then click on Add Single PST file.
Select the PST file from its location for conversion and hit the Next button
Click on the Multiple PST file radio button from the Add source section, then click on Add Multiple PST file.

Select the folder to add Outlook PST files in the software, and Make selection of required files for conversion.
After selecting the required PST files, hit the Next button
Step 3:- Software will now start the scanning process to repair corrupt PST file & load all PST folders.

After this, click on the inner folder of PST file to load inner mailbox items from PST.

Step 4:-Check all emails, contacts, calendars, and other Outlook items individually from PST file in the preview panel

Make selection of required folders from the PST files & then click the "Convert" button
Step 5:- Now, a new window will open by the software with multiple conversion formats and other options
Choose a file format from the converssion options list:-
To Convert your Older PST to New PST file or any other format, select any of these options.
- Export to PST:- Export and save from your older PST to new PST file. User can select this option for both single as well as bulk PST file conversion and can create separate file for each PST mailbox.
(Select "Split PST" to split large sized resulted PST files in several small PST files by size range)
- Single PST for All Mailbox:- Use this option while making Bulk PST file Conversion. Easily save all mailbox folder and items of multiple PST files in a Single PST.
- Export to MBOX:-Convert PST file to MBOX file format for email clients like- Thunderbird, OperaMail, etc
- Export to Zimbra (TGZ):- Convert PST to TGZ file format for Zimbra Desktop email client.
- Export to MSG:- Convert PST to MSG and save emails, contacts, calendar items of Outlook separately in MSG files.
- Export to EML:- Extract/Export emails from Outlook PST file save them individually to EML files.
- Export to EMLX:- Convert PST emails to EMLX file format for MAC based email client Apple Mail.
- Export to HTML:- Convert PST to HTML format to open Outlook emails with web browsers.
- Export to ICS:- Export and save calendar items of Outlook as ICS file format.
- Export to vCard (.vcf):- Move contacts items from Outlook PST file to vCard (.vcf) files.
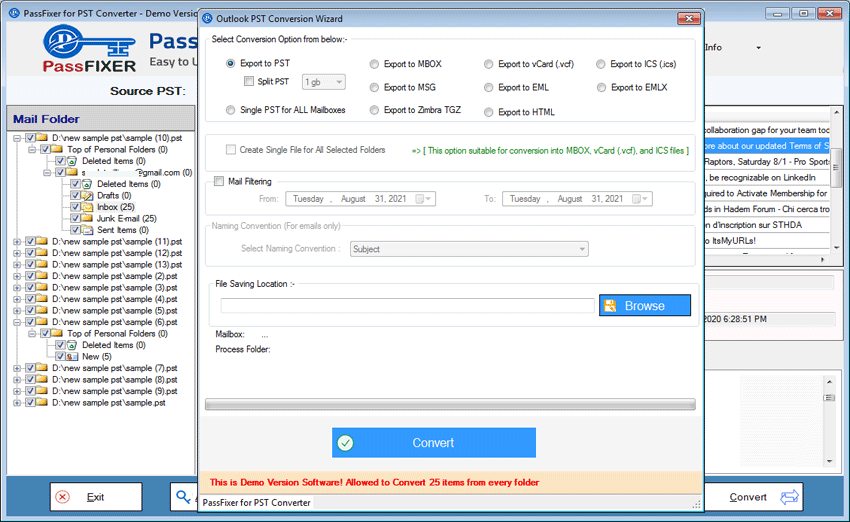
Choose the required format from the conversion option list. Then use "Mail Filtering" to filter emails by date range.
Click on "Browse" button to select the location to save the resulted file.
Step 6:- In the Final step, click on "Convert" and begin the PST file Conversion process.

After conversion completion, a new window with "Conversion Process Completed Successfully" messege will appear on your screen. Simply click on Ok to close this screen

System Essentials
- Pentium class processor
- Minimum 128MB RAM (512MB recommended)
- 50MB for software installation
- .NET FrameWork 4.0 client profile installation required on computer
- Versions Support Windows OS platforms- Windows 10/8.1/8/7/Vista.
- No MS Outlook Installation Requirement
Installation process of PST Converter Software
Know "how to install PST Converter software".
Download "PassFixer PST Converter Software"
https://www.passfixer.com/download/passfixerpstconverter.exe
After getting the exe file of PST Converter tool, follow the below mentioned steps to safely install the software
- Double click on the EXE file and launch the setup file for software Installation.
- Read and Follow the instructions for installation.
- After installation "finish" button and open the software to perform Outlook PST file conversion
How to uninstall the PassFixer PST Converter software from your machine:
Un-install the PassFixer PST Converter software from your computer by applying the given steps
- Hit the Window key or Start button in your computer
- Then Hover or Click on All programs option
- Search and open Passfixer PST Converter folder
- Click on the file "Uninstall.exe".
- After this PassFixer PST Converter uninstalling process of this software will start.
- After completion the software will successfully uninstalled from the your PC. Click OK to close the window.
Uninstall PassFixer PST Converter software from control panel, by applying the steps given below.
- Open Control Panel on your computer
- Double click on “Programs and Features” option.
- Right-Click on PassFixer PST Converter software & click on Uninstall option
- Click "Yes" button to uninstall the software
- Select OK button